
Table of Contents
Introduction
In my day-to-day as an indie developer, you rarely have a single clean, well-defined task. Most of the time you’re reading code across multiple files, planning a refactor, implementing a feature, and reviewing work done — all at the same time. Each of those activities requires a different mindset, different tools, and different permission levels. Doing all of that with a single agent is like asking myself to be architect, test writer, DBA, and security specialist simultaneously. It works, but it’s not optimal (and it’s not efficient).
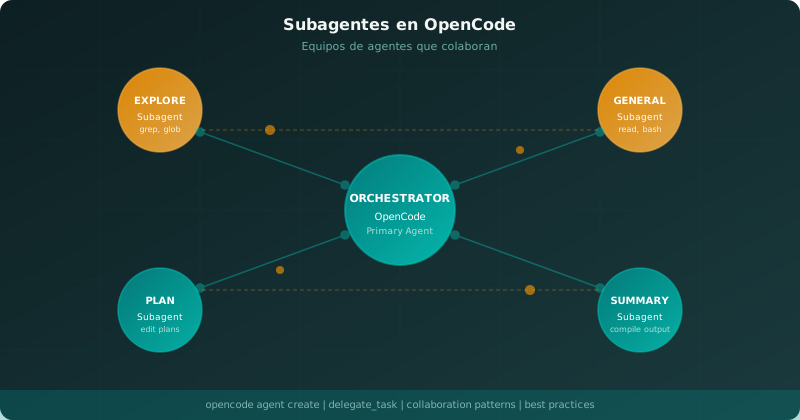
OpenCode solves this with a system of agents that includes two fundamental roles: primary agents and subagents. Primary agents are the main assistants you interact with directly. Subagents are specialized assistants that can be invoked for specific tasks, work in parallel, or help you — and the primary agent — with research, exploration, or analysis without interrupting the main workflow.
In this article we’ll dive deep into subagents: what they are, how the built-in ones work in OpenCode, how to invoke them, how to configure them, and how to create your own custom subagents to adapt OpenCode to your indie developer workflow.
Primary agents vs. subagents: what’s the difference?
OpenCode distinguishes between two types of agents:
Primary agents are your main assistants. When you start a session in OpenCode, you’re talking to a primary agent. These agents handle your main conversation and can invoke subagents when they detect a task would benefit from a specialized handler. Primary agents cycle with the Tab key or your configured switch_agent keybind. OpenCode ships with two built-in primary agents: Build (all tools enabled) and Plan (restricted — for analysis and planning only, with no file write or bash permissions by default).
Subagents are specialized assistants running in child sessions linked to the main session. A primary agent may decide to invoke them automatically when it needs to perform a task that better fits a subagent’s capabilities. You can also invoke them manually by mentioning them with @ in your message: for example, @explore analyze the project structure.
The parent session and the subagent child sessions are connected. You can navigate between them using dedicated keyboard shortcuts. This means a subagent is not an isolated process — it’s part of a broader conversation that maintains shared context.
The built-in subagents in OpenCode
OpenCode ships with three built-in subagents designed for the most common software development scenarios. Let’s look at each one.
General: the general-purpose worker
Mode: subagent
The General subagent is a general-purpose agent capable of executing complex multi-step tasks. It has full access to all tools except todo (the task management tool), which means it can read files, modify them, run terminal commands, and conduct research without restrictions. The difference with the primary Build agent is that General runs in a separate session and its work is presented as a sub-task within the main conversation.
Use General when you need to execute multiple units of work in parallel or when you want to delegate a complex task without interrupting your main session. For example: «@general research how to implement JWT authentication in this project and create a file with the available options».
Explore: the code explorer
Mode: subagent
The Explore subagent is a read-only agent designed for quickly exploring codebases. It cannot modify files. Its specialty is finding files by patterns, searching code for keywords, or answering questions about a project’s structure.
Use Explore when you need to understand an unfamiliar codebase without any risk of modifying it. It’s perfect for answering questions like «where is the User class defined?» or «which files would this database migration touch?». Since it has no write permissions, you can use it with complete peace of mind — it won’t alter your code.
Scout: the external researcher
Mode: subagent
The Scout subagent is a read-only agent specialized in external documentation and dependency research. Unlike Explore, which works only with your local codebase, Scout can clone dependency repositories into OpenCode’s managed cache, inspect library source code, and cross-reference your local code against upstream implementations without modifying your workspace.
Use Scout when you need to understand how a library you’re using works, verify changes between dependency versions, or investigate a specific implementation in an npm package or Python module’s source code. It’s especially useful in indie projects where you don’t have a dedicated platform engineer but still need to deeply understand the tools you use.
Hidden system agents
In addition to the subagents you can invoke manually, OpenCode includes three system agents that run automatically when needed:
- Compaction (mode: primary, hidden): compacts long context into a smaller summary. Runs automatically when context grows too large.
- Title (mode: primary, hidden): generates short session titles. Runs automatically.
- Summary (mode: primary, hidden): creates session summaries. Also runs automatically.
These agents aren’t selectable in the UI. OpenCode invokes them internally when it detects they’re necessary — for example, when a session has become too long and needs to be summarized to maintain performance.
When and how they work (visual)
Text and tables help, but the decision of which subagent to invoke and the mechanics of how an invocation actually plays out are much easier to grasp in a diagram. Here are the two pieces that took me the longest to understand at first.
When do I use each subagent?
The key question isn’t “what model should I use?” but where am I working and what do I need to do? Local vs. external, read vs. write, fast vs. multi-step. This infographic condenses the decision tree into a single page:
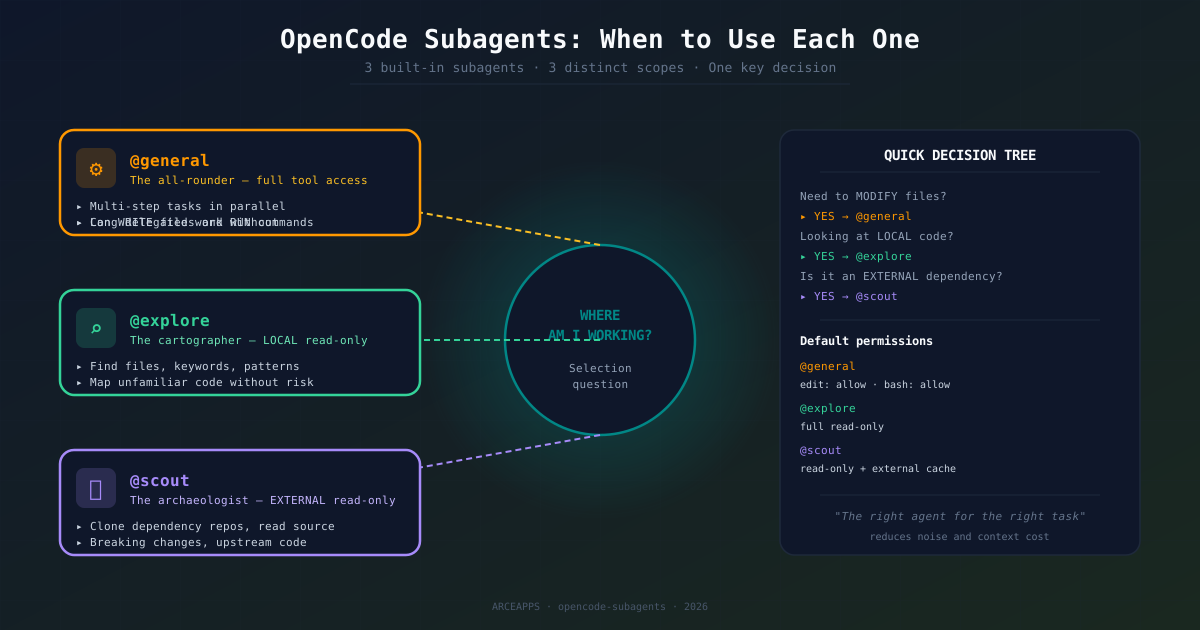
The underlying idea: @general is the exception, not the rule. By default I prefer @explore (fast, local, cheap on tokens) or @scout (when the code I care about lives in another repository). I only escalate to @general when the task requires modifying files or running commands, and even then I make sure its permissions are scoped to the minimum necessary.
How does an invocation actually run?
Behind a simple @scout … there are five steps that involve the primary agent, an isolated child session, and a result that flows back into the parent’s context. This is the real mechanics:
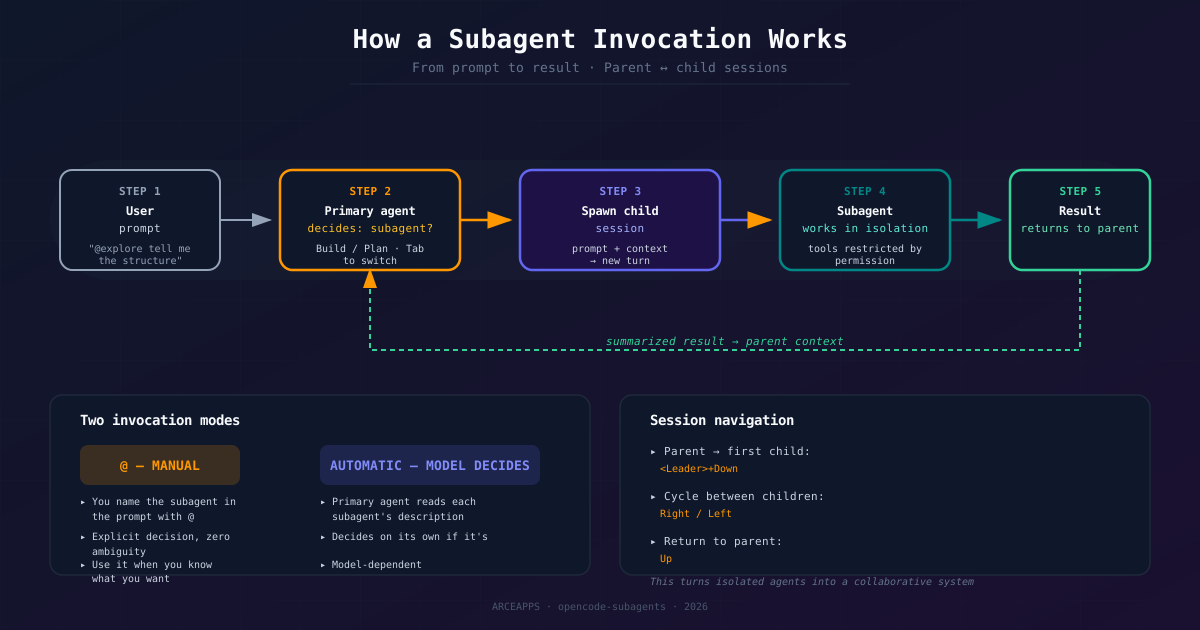
If you take a single idea from this diagram, let it be this: the subagent does not share your context 100%. It inherits part of the parent’s context (prompt + prior work), but runs in its own session with a clean system prompt and filtered permissions. That’s why @scout can touch external dependencies without touching your code.
How to invoke subagents
There are two ways to invoke a subagent:
Automatic invocation
Primary agents can decide on their own to invoke a subagent when they detect that a task fits better with a specialized agent’s capabilities. For instance, if the Build agent needs to investigate how an external library works to complete your request, it might automatically invoke the Scout subagent for that research.
Automatic invocation depends on each subagent’s description and the underlying language model. OpenCode doesn’t force automatic invocation — it’s a model decision based on conversation context.
Manual invocation with @
You can invoke a subagent manually by mentioning it with the @ symbol followed by the agent name:
@general Help me search for all functions that use this REST API
@explore How many files are in the src/utils directory?
@scout Research the differences between version 3 and 4 of this library
This form of invocation is useful when you know exactly what kind of task you need and want to be explicit with the agent.
Session navigation
When a subagent creates a child session, OpenCode allows you to navigate between the parent session and the child sessions using keyboard shortcuts. This is fundamental for understanding the workflow and monitoring what each subagent is doing.
The relevant shortcuts are:
- session_child_first (default:
<Leader>+Down): enters the first child session from the parent. - session_child_cycle (default:
Right): cycles to the next sibling session when inside a child session. - session_child_cycle_reverse (default:
Left): cycles in reverse direction. - session_parent (default:
Up): returns to the parent session.
With <Leader>+Down you enter the first child session created by a subagent. Once inside, Right and Left let you cycle between child sessions if there are multiple active ones. Up returns you to the main conversation with the primary agent. This navigation pattern lets you move from the big picture (parent session) to the detail (child sessions) without losing context.
Configuring existing subagents
OpenCode lets you customize the built-in subagents or create your own. Configuration can be done in two formats: JSON in your opencode.json file, or Markdown files placed in an agents directory.
JSON configuration
Open your opencode.json file and add an agent section. Here you can customize the model, prompt, permissions, and other options:
{
  "$schema": "https://opencode.ai/config.json",
  "agent": {
    "build": {
      "mode": "primary",
      "model": "anthropic/claude-4.8-sonnet",
      "prompt": "{file:./prompts/build.txt}",
      "permission": {
        "edit": "allow",
        "bash": "allow"
      }
    },
    "plan": {
      "mode": "primary",
      "model": "anthropic/claude-4.8-haiku",
      "permission": {
        "edit": "deny",
        "bash": "deny"
      }
    },
    "code-reviewer": {
      "description": "Reviews code for best practices and potential issues",
      "mode": "subagent",
      "model": "anthropic/claude-4.8-sonnet",
      "prompt": "You are a code reviewer. Focus on security, performance, and maintainability.",
      "permission": {
        "edit": "deny"
      }
    }
  }
}
Markdown configuration
You can also define agents using Markdown files placed in:
- Global:
~/.config/opencode/agents/ - Per-project:
.opencode/agents/
Example of ~/.config/opencode/agents/review.md:
---
description: Reviews code for quality and best practices
mode: subagent
model: anthropic/claude-4.8-sonnet
temperature: 0.1
permission:
  edit: deny
  bash: deny
---

You are in code review mode. Focus on:
- Code quality and best practices
- Potential bugs and edge cases
- Performance implications
- Security considerations

Provide constructive feedback without making direct changes.
The file name becomes the agent name. In this case, review.md creates an agent called review that you can invoke with @review.
Detailed configuration options
Let’s look at each configuration option in detail so you can fine-tune your subagents.
Description
The description is required. It defines what the agent does and when it should be invoked:
{
  "agent": {
    "researcher": {
      "description": "Researches external libraries and their versions"
    }
  }
}
A good description helps both you (to remember what each agent is for) and the language model (to decide when to invoke it automatically).
Temperature
Controls the randomness and creativity of the model’s responses. Typical values:
- 0.0 – 0.2: Very focused and deterministic responses. Ideal for code analysis and planning.
- 0.3 – 0.5: Balanced responses with some creativity. Good for general development tasks.
- 0.6 – 1.0: More creative and varied responses. Useful for brainstorming and exploration.
{
  "agent": {
    "plan": {
      "temperature": 0.1
    },
    "creative": {
      "temperature": 0.7
    }
  }
}
If no temperature is specified, OpenCode uses model-specific defaults (typically 0 for most models, 0.55 for Qwen models (like Qwen3.7-Max)).
Max steps
Controls the maximum number of agentic iterations an agent can perform before being forced to respond with text only. This is useful for cost control: a subagent stuck in an infinite loop can consume a lot of unnecessary tokens.
{
  "agent": {
    "explore": {
      "maxSteps": 10
    }
  }
}
Mode
Defines whether the agent is primary, subagent, or all:
- primary: Acts only as a primary agent. Cannot be invoked as a subagent.
- subagent: Can only be invoked as a subagent.
- all: Can act both as primary and be invoked as a subagent.
Hidden
When hidden is true, the agent doesn’t appear in the agent selection list. Hidden agents are useful for system agents like Compaction, Title, and Summary that need to exist but don’t need to be selected manually.
Custom prompt
You can override an agent’s system prompt to give it a specific personality or focus:
{
  "agent": {
    "security-auditor": {
      "description": "Audits code for security vulnerabilities",
      "mode": "subagent",
      "prompt": "You are a cybersecurity expert. When reviewing code, think about: SQL injection, XSS, access control, secret management, and common vulnerabilities in the tech stack you are analyzing."
    }
  }
}
Color
You can assign a hexadecimal color to each agent for visual distinction in the UI:
{
  "agent": {
    "review": {
      "description": "Code reviewer",
      "color": "#FF5733"
    }
  }
}
Tools (deprecated)
Historically there was a tools option to control access to specific tools. This option is deprecated and maintained for backwards compatibility. Use the permissions system (permission) instead.
Permissions: the guardrails system
One of the most powerful features in OpenCode is the per-agent permissions system. Each agent can have granular permissions for different operation types.
Available permissions are:
- edit: Controls file writes, patches, and edits.
- bash: Controls terminal command execution.
- webfetch: Controls HTTP request capabilities.
- doom_loop: Controls automatic task loops (deprecated).
- external_directory: Controls access to directories outside the project.
Each permission can have three values:
- allow: The agent can perform this operation without confirmation.
- deny: The agent cannot perform this operation.
- ask: The agent asks for confirmation before performing it.
Example of a restrictive configuration for a review-only agent:
{
  "agent": {
    "security-auditor": {
      "mode": "subagent",
      "permission": {
        "edit": "deny",
        "bash": "deny",
        "webfetch": "ask",
        "external_directory": "deny"
      }
    }
  }
}
This security agent can ask questions (webfetch with ask — prompts for confirmation) but cannot modify files or run potentially dangerous commands.
Practical use cases
Let’s look at real-world scenarios where subagents truly shine.
Parallel research
Imagine you need to implement a new feature that depends on researching three different libraries. Instead of running three sessions sequentially, you can launch three General subagents in parallel, each researching a different library:
@general Research available OAuth2 authentication options for Node.js
@general Research the differences between Prisma and Drizzle ORM
@general Research best practices for REST APIs in Express
Each subagent works independently and you can then review the results in their respective child sessions before making decisions.
Code review without context switching
When you’re in the middle of an implementation task, it’s tempting to postpone code review until the end. But often bugs are caught more easily in the moment. A dedicated reviewer subagent lets you get feedback without changing context:
@review Review the file src/auth/login.ts for vulnerabilitiesThe reviewer analyzes the file, gives you feedback, and you decide when to integrate it. Your main session with Build isn’t interrupted.
Legacy codebase exploration
When you face code you didn’t write (or wrote a long time ago), use Explore to understand the structure before making changes:
@explore What is the overall project structure? Give me a summary of the main modulesExplore gives you a high-level view without modifying anything. It’s like having a technical mentor right in your terminal who already knows your code and can guide you.
Dependency research
Before updating a critical dependency, use Scout to investigate the changelog and breaking changes:
@scout Research the breaking changes between version 2.x and 3.x of this libraryScout can clone the upstream repository, review relevant commits, and give you an actionable summary without you having to do the archaeology work yourself.
Best practices
Based on my experience with OpenCode and the patterns that work best, here are some recommendations:
Use the right agent for the right task. Don’t use Build for everything. If you only need to explore code, use Explore. If you only need to plan, use Plan. This reduces noise in your main session and keeps context cleaner.
Configure restrictive permissions by default. Subagents you create for specific tasks don’t need all permissions. A research agent doesn’t need edit: allow. A review agent doesn’t need bash. Restrictive permissions are guardrails that prevent costly mistakes.
Use low temperature for technical tasks. For code analysis, planning, and review, use low temperature (0.0 – 0.2). Responses will be more predictable and focused. Save high temperature for brainstorming and idea generation.
Use Markdown files for complex agents. If an agent has a very long prompt or you want to version its configuration alongside the project, use the Markdown format in .opencode/agents/. It’s more readable and keeps configuration close to code.
Navigate between sessions actively. In my workflow, I never leave subagent results unreviewed. Use <Leader>+Down to enter child sessions, review progress, and return to the parent with Up. Active navigation is what turns a set of isolated agents into a truly collaborative workflow.
Limitations and considerations
Subagents are not completely isolated processes. They share the parent session context in a limited way: the parent knows the result of the child’s work, but the child doesn’t necessarily know all the parent’s context. This can lead to duplicated effort if you’re not explicit in your prompts.
Another point to consider: subagents consume resources from the model you’re using. Each subagent runs in its own session and generates its own input and output tokens. In large projects with many subagents, token costs can grow significantly. Use maxSteps to set limits.
Finally, automatic subagent invocation depends on the language model. Not all models decide to invoke subagents the same way. More recent and capable models tend to use subagents more intelligently.
Advanced Use Cases: Subagents in Practice
In my daily workflow, I’ve refined the way I interact with these subagents. It’s not just about delegating simple tasks, but about building processing pipelines where each agent assumes a specific role, emulating peer review and in-depth analysis without ever leaving my local environment.
1. Large-Scale Code Migrations
When I need to migrate a codebase from one architecture to another (for example, moving from RxJava to Kotlin Coroutines in an Android project), I don’t unleash the primary agent to rewrite everything. That inevitably leads to hallucinations, compilation errors, and loss of context.
Instead, I use a three-step approach with subagents:
-
Exploration Phase (
@explore): I ask@exploreto map all instances where RxJava is used. “Analyze this module and extract a list of all classes implementingSingle,Observable, orCompletable”. The agent reads the code and generates amigration_plan.md. -
Implementation Phase (
@generalin parallel): For each isolated component (e.g., aRepositoryand itsViewModel), I launch a@generalto perform the specific migration based on the plan. By doing this in separate sessions, context errors are minimized. -
Review Phase (
@review): Once@generalfinishes, I use my custom@reviewsubagent to audit the changes. “Review the migration diff inUserRepository.kt. Ensure the Coroutines exception handling is equivalent to the RxJava implementation and check for potential memory leaks”.
This flow has saved me countless hours of debugging.
2. Local Security Audits
Security in mobile and web applications is non-negotiable. Before pushing a new release, I run a specialized security subagent:
{
  "agent": {
    "security-audit": {
      "description": "Audits code for vulnerabilities (OWASP, injection, memory leaks)",
      "mode": "subagent",
      "model": "anthropic/claude-4.8-sonnet",
      "temperature": 0.0,
      "permission": {
        "edit": "deny",
        "bash": "deny"
      },
      "prompt": "Act as a static security auditor. Review the provided code looking for OWASP Top 10 vulnerabilities, insecure state management in Compose, and sensitive data leaks in logs."
    }
  }
}
I can invoke it with @security-audit review the latest commits in the auth module. Because it has edit: deny, I know it won’t break anything. Its only job is to generate a critical report.
3. Automated Documentation Generation
Writing documentation is the least glamorous part of development, but vital. I use a @doc-gen subagent that handles this:
{
  "agent": {
    "doc-gen": {
      "description": "Generates KDoc/JSDoc and updates the README.md",
      "mode": "subagent",
      "model": "anthropic/claude-4.8-haiku",
      "temperature": 0.2
    }
  }
}
Note that I use claude-4.8-haiku here. For structured documentation tasks, a fast and efficient model is sufficient and saves significant costs compared to Sonnet.
Context and Cost Considerations
Using subagents isn’t free. Every subagent session consumes input tokens (the shared context) and output tokens. Here are my golden rules for keeping costs under control:
- Limit initial context: Don’t invoke a subagent from a primary session that already has 150 conversation turns. The subagent will inherit that massive context. It’s better to start a fresh, clean session for heavy tasks.
- Use the right model: Not everything needs
claude-4.8-sonnet. For formatting tasks, simple parsing, or light exploration, Haiku models or even mid-sized local models (if you have the hardware) are more than capable. - Watch the
maxSteps: A subagent that enters an error-correction loop (tries to compile -> fails -> tries to fix -> fails) can drain your API balance in minutes. KeepmaxStepslow (between 5 and 10) to force the agent to stop and ask for your input.
The Future: Autonomous Agents and MCP
Subagents are just the beginning. With the recent integration of the Model Context Protocol (MCP), these subagents are no longer limited to the source code. In my current setup, my subagents can query my Obsidian notes database (via a local MCP server) to recall architectural decisions I made months ago.
In fact, in the current ecosystem (May 2026), the combination of OpenCode with Claude 4.8 Sonnet and MCP tools is blurring the line between “autocomplete tool” and “developer colleague”.
Conclusion
Integrating subagents into your OpenCode workflow isn’t about working less, it’s about working better. By separating responsibilities (exploration, code writing, security review), you reduce the cognitive load for both yourself and the underlying LLM.
As an indie developer, my time is my most valuable resource. Subagents act as that “collaborative stack” that takes on background tasks, allowing me to focus on architecture, design, and core business logic.
Bibliography and references
-
OWASP Top 10 Mobile Risks — For the security audit subagent context.
-
Kotlin Coroutines Documentation — Reference for migrating from RxJava.
-
Model Context Protocol (MCP) — Information about MCP and its ecosystem.
-
Qwen 3.7 Max Launch — Context and documentation regarding temperature settings in Qwen models.
-
Anthropic Claude 4.8 Release — Information regarding the Claude 4.8 Sonnet and Haiku models.
-
OpenCode Agents Documentation — Official agents documentation on OpenCode
-
OpenCode SDK — Official SDK for integrating OpenCode into your projects
-
opencode-telegram-bot — Example project using OpenCode subagents via SDK
-
OpenCode GitHub Repository — Official project repository
Have a subagent use case not covered here? Markdown agent files support any prompt you can imagine. Experiment with different configurations and find the workflow that best fits your indie developer style.
You might also be interested in
OpenCode Subagents: Workflows, Use Cases, and Superpowers
Learn how to design agentic workflows with OpenCode subagents. Discover how to combine cheap and frontier AI models to automate tasks like Superpowers.
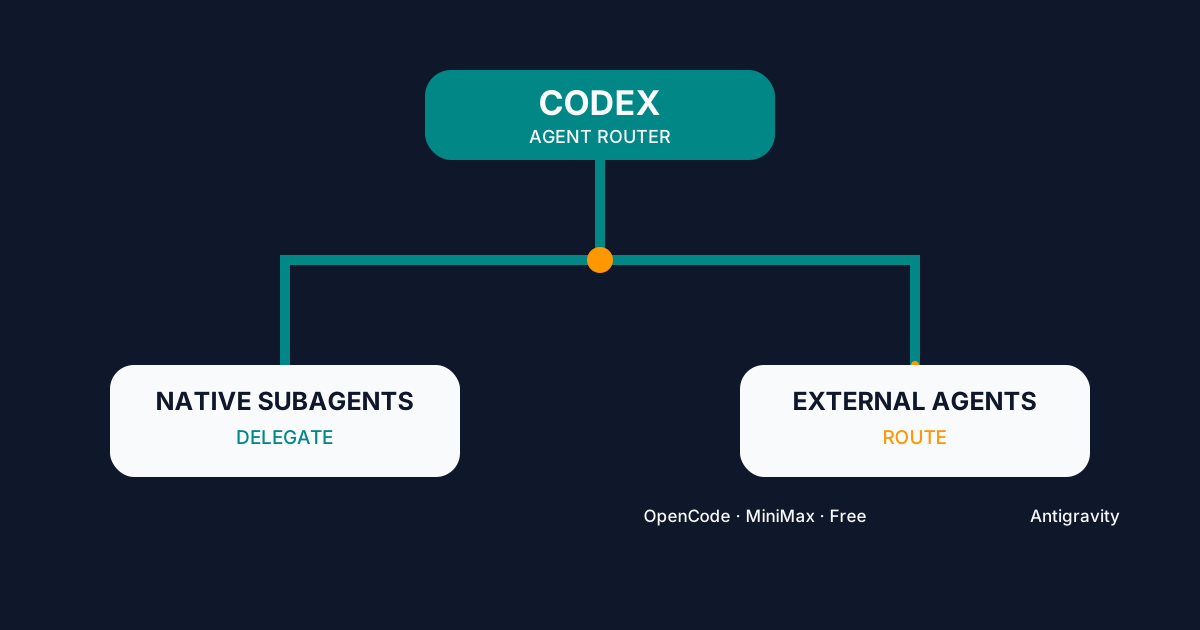
Codex Agent Router: Orchestrating External Agents
Configure Codex Agent Router to delegate to native subagents or route work to OpenCode, MiniMax, Big Pickle, and Antigravity from one interface.
AI Agent Goals: Loops That Iterate Until Done
How to hand an AI agent a verifiable goal and let it iterate alone: /goal, Ralph loops, turn budgets, independent verifiers and real failure modes.